
Por fin ha llegado la parte 3 de creando mi propio IDE donde empezaremos a conectar todo el Front a la parte Back que hicimos en nuestro tutorial anterior, pero si te lo perdiste, te dejo el enlace:
En esta parte trataremos de conectar algunos de nuestros ends, quizá haya cambios que en las publicaciones anteriores se me haya escapado así que … no me odies, hago esto «al vuelo» 😉
Lo primero es generar un servicio que podamos reusar para hacer llamadas a nuestro «API» que en el tutorial anterior creamos, lo nombraremos http.service.ts y estará en el mismo nivel que app.component.ts en realidad no importa ni su nombre ni ubicación tanto pero ahí lo pondremos:
import {Injectable} from '@angular/core';
import {HttpHeaders, HttpClient} from '@angular/common/http';

import {Observable} from 'rxjs';
import {Router} from '@angular/router';

const API_URL = "http://localhost:3000";

@Injectable({
  providedIn: 'root'
})
export class ApiHttpService {

  public headers: any;

  public apiUrl = API_URL;

  constructor(
    private http: HttpClient,
    public router: Router
  ) {
    this.headers = {
      headers: new HttpHeaders({
        'Content-Type': 'application/json',
        Accept: 'application/json'
      })
    };
  }

  public get(url: string): Observable {
    return this.http.get(
      this.apiUrl + url,
      this.headers
    );
  }

  public post(url: string, body: any): Observable {
    return this.http.post(
      this.apiUrl + url,
      JSON.stringify(body),
      this.headers
    );
  }

  public put(url: string, body: any): Observable {
    return this.http.put(
      this.apiUrl + url,
      JSON.stringify(body),
      this.headers
    );
  }

  public delete(url: string): Observable {
    return this.http.delete(
      this.apiUrl + url,
      this.headers
    );
  }

  public patch(url: string, body: any) {
    return this.http.patch(
      this.apiUrl + url,
      JSON.stringify(body),
      this.headers
    );
  }
}
Notemos que tenemos 1 función por cada método, y que en la parte superior agregamos http://localhost:3000 como la URL ya que nos estaríamos conectando al API en su base… cuando tenemos esto, podemos avanzar.
Ahora, para continuar lo primero que haremos será generar la conexión para obtener un directorio raíz apenas abramos nuestro IDE. Recordando, ya tenemos la base del usuario como directorio principal, así que haremos el pull a «/» y simplemente obtendremos lo que haya.
Hasta aquí antes de implementar esto haré un paréntesis, en el app.module deben cargar el HttpClientModule más o menos así:
// En la parte superior el import:

import {HttpClientModule} from "@angular/common/http";

// Y en los imports:
imports: [
   ...
   HttpClientModule
   ...
]
Ahora sí necesitamos cargar nuestro pedacito de código dentro del constructor de app.component y como import para nuestros «proveedores» de la siguiente forma:
// "Hasta arriba" (o cerquita de arriba en los imports :P):
import {ApiHttpService} from "./http.service";

// En el @Component:
@Component({
  selector: 'app-root',
  templateUrl: './app.component.html',
  styleUrls: ['./app.component.css'],
  providers: [ApiHttpService] //<--agregamos esta línea
})

...
// Y en el constructor
constructor(private apiService: ApiHttpService) {
...
}
Abramos otro paréntesis, si hasta aquí ejecutásemos la petición veríamos en consola que nos marca un problemirijillo de CORS, así que hay de 2, hacemos un PROXY para Angular o … abrimos CORS en NodeJS,en este caso haremos lo segundo PERO, te dejo un tutorial si quieres hacerlo desde Angular…
Así que vamos a nuestro proyecto de backend para el IDE e instalamos la siguiente dependencia https://www.npmjs.com/package/cors:
npm install corsEn nuestro archivo index.js lo implementamos:
// Hasta arriba debajo de los require anteriores hacemos el import:
const cors = require('cors');
// Y abajo del app.use(bodyParser...) hacemos el uso:
app.use(cors());
Y eso es todo. Ahora sí podemos iniciar nuestro proyecto y veremos que funciona si hacemos el GET, en nuestro constructor de app.component hacemos la prueba:
constructor(private apiService: ApiHttpService) {
    this.apiService.get('/').subscribe((response) => {
      console.log(response);
    });
    ...
}
Como notita, recuerda, los ... significa que hay algo por ahí, no hagas el copiar/pegar así de agresivo 😛 para que no te salgan errores.
Así que entonces veríamos algo así en la consola:

Ignora que tapé mis carpetas con cosas de «adultos» 😉😉(no es cierto son puras cosas de programación)… pero podemos ver que está el nombre y saber si es directorio… o no.
Para integrarlo lo haremos modificando casi en su totalidad el constructor de la siguiente manera:
constructor(private apiService: ApiHttpService) {
    this.items = [];
    this.apiService.get('/').subscribe((response) => {
      const internalItems: any[] = [];
      for(const item of response.datos) {
        internalItems.push({
          text: item.nombre,
          value: item.nombre,
          collapsed: true,
          disabled: false,
        })
      }
      this.items = [new TreeviewItem({
        text: 'ide', value: 1, collapsed: true, disabled: false, children: internalItems
      })];
    });
  }
Si hacemos click donde dice «IDE», veremos que se despliega nuestro listado:
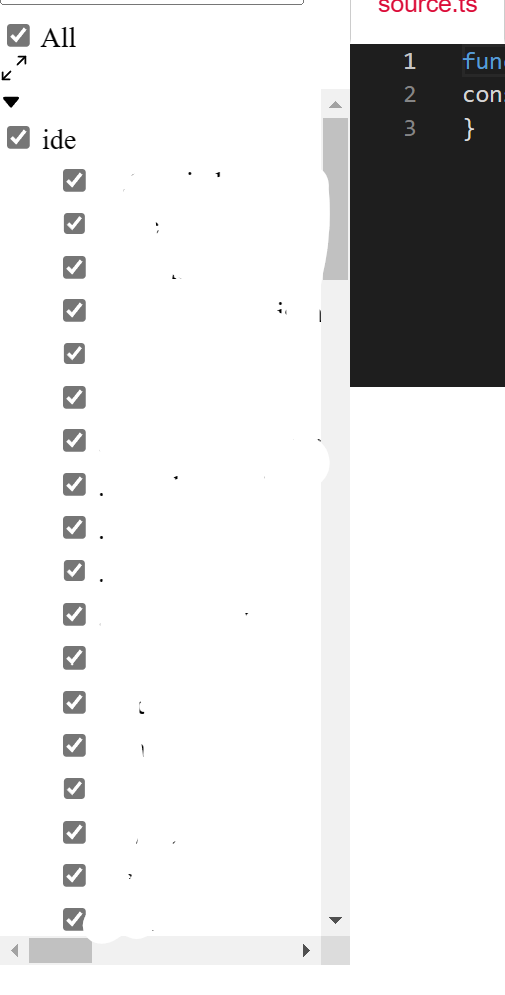
Ahora, debido a que Ngx-TreeView tiene una forma peculiar de hacer un select de objetos, lamentable selección a veces de elementos, pero así es esto. Por concluyente, vamos a copiar algo de su código pero a nuestra manera y debido a esto concluiremos este tutorial y nos vamos hasta unos «infinitos» tutoriales (lo siento joven lector, la idea es hacerlos no tan larguísimos y enfadosos):
En nuestro app.component vamos a agregar la siguiente lógica:
// Una variable llamada "value"
value = '';
// Vamos a borrar la variable config

// La siguiente función:
onValueChange(value: number): void {
  console.log(value);
}
Y eso es todo :D, ha no te creas, bueno sí pero solo en ese archivo, lo siguiente es crear un montón de ficheros, te paso los nombres:
dropdown-treeview-select.component.html
dropdown-treeview-select.component.scss
dropdown-treeview-select.component.ts
dropdown-treeview-select-i18n.ts
Y ahora los contenidos, una vez que terminemos esta parte, te mostraré cómo luce y vamos a continuar en la siguiente parte del tutorial porque ya es demasiado por este y no quiero abrumarte…
Dentro del HTML agregamos:
Dentro del archivo TS (que no es el que termina en i18n):
import { Component, Input, Output, EventEmitter, ViewChild, OnChanges } from '@angular/core';
import { TreeviewI18n, TreeviewItem, TreeviewConfig, DropdownTreeviewComponent, TreeviewHelper } from 'ngx-treeview';
import { DropdownTreeviewSelectI18n } from './dropdown-treeview-select-i18n';

@Component({
  selector: 'ngx-dropdown-treeview-select',
  templateUrl: './dropdown-treeview-select.component.html',
  styleUrls: [
    './dropdown-treeview-select.component.scss'
  ],
  providers: [
    { provide: TreeviewI18n, useClass: DropdownTreeviewSelectI18n }
  ]
})
export class DropdownTreeviewSelectComponent implements OnChanges {
  @Input() config: TreeviewConfig;
  @Input() items: TreeviewItem[] = [];
  @Input() value: any;
  @Output() valueChange = new EventEmitter();
  @ViewChild(DropdownTreeviewComponent, { static: false }) dropdownTreeviewComponent: DropdownTreeviewComponent | undefined;
  filterText = '';
  private dropdownTreeviewSelectI18n: DropdownTreeviewSelectI18n;

  constructor(
    public i18n: TreeviewI18n
  ) {
    this.config = TreeviewConfig.create({
      hasAllCheckBox: true,
      hasFilter: true,
      hasCollapseExpand: true,
      decoupleChildFromParent: false,
      maxHeight: 500,
    });
    this.dropdownTreeviewSelectI18n = i18n as DropdownTreeviewSelectI18n;
  }

  ngOnChanges(): void {
    this.updateSelectedItem();
  }

  select(item: TreeviewItem): void {
    if (!item.children) {
      this.selectItem(item);
    }
  }

  private updateSelectedItem(): void {
    if (this.items) {
      const selectedItem = TreeviewHelper.findItemInList(this.items, this.value);
      this.selectItem(selectedItem);
    }
  }

  private selectItem(item: TreeviewItem): void {
    if (this.dropdownTreeviewSelectI18n.selectedItem !== item) {
      this.dropdownTreeviewSelectI18n.selectedItem = item;
      if (this.dropdownTreeviewComponent) {
        this.dropdownTreeviewComponent.onSelectedChange([item]);
      }

      if (item) {
        if (this.value !== item.value) {
          this.value = item.value;
          this.valueChange.emit(item.value);
        }
      }
    }
  }
}
Ahora sí en el archivo TS que es para i18n:
import { Injectable } from '@angular/core';
import { TreeviewItem, TreeviewSelection, DefaultTreeviewI18n } from 'ngx-treeview';

@Injectable()
export class DropdownTreeviewSelectI18n extends DefaultTreeviewI18n {
  private internalSelectedItem: TreeviewItem | undefined;

  set selectedItem(value: TreeviewItem) {
    this.internalSelectedItem = value;
  }

  get selectedItem(): TreeviewItem {
    return this.internalSelectedItem;
  }

  override getText(selection: TreeviewSelection): string {
    return this.internalSelectedItem ? this.internalSelectedItem.text : 'Please select';
  }
}
Por último en el SCSS:
label {
  margin-bottom: 0;
  cursor: pointer;
}

.bi {
  cursor: pointer;
  margin-right: 0.3rem;
}
Y ya para finalizar, importamos el Componente en el app.module :
// Como de costumbre el import arriba:
import {DropdownTreeviewSelectComponent} from "./dropdown-treeview-select.component";

// Y en las declarations:
  declarations: [
    AppComponent,
    DropdownTreeviewSelectComponent
  ],
¡Listo!, si hicimos todo bien, deberíamos ver lo siguiente:

Y dirás, ¿aquí qué?, lo veo casi igual pues no, si cliqueamos el «ide» entonces veríamos la lista y podemos seleccionar cosas, por ejemplo:

Con esto, ya podemos ir empezando a abrir archivos, pero como dije, no quiero abrumarte, así que nos vemos en la cuarta entrega…